
Excited about this year’s Yart Sale!
Altar offerings of mooncakes will be looking for their permanent homes this weekend.
I still have the following items for sale:
Chanterelle mushroom earrings (multiple!)
mooncake earrings (a few)
orange earrings (a few)
chinese donut pins (a few)
chinese corn, mayo, and scallion bread pin (a few)
sweet potato bread charm (a few)
baguette in a paper bag hair pin (a few)
new items:
Chinese roasted BBQ bun magnets!
You get 1 bauble for free if you buy something! Grants you access to the tchotchke box. his box contains B grade miniatures, flameworked glass beads and sculptures, charms, shrinky dinks, all hand made.
Pictures will be added soon
Urban Foraging for Frugal Witches
Foraging/Collecting/Salvaging/Urban Foraging
This article was not generated or aided by AI or language processing softwares.
My grandma survived the Communist Revolution famines and passed down her savvy street smarts and survival skills to me. A quick eye is necessary for you to spot these goodies. Being swift about your choices and decisive when you need to be can help you harness your resourcefulness.
My mom taught me how to stir fry wild allium, or “highway onion” as my partner calls them, with eggs for a fresh omelet. Wild garlic green stems have a pungent happy taste and crisp mouthfeel, without any bitterness or sharpness, unlike the green onion from the grocery store. ((Always be 100% sure before consuming anything in the wild, please refer to professional guide for identification.))
This is turning into a kitchen blog post! Whoops.
Hint: don’t collect wild garlic from the freeway, or near walkways. Often these have been generously showered with dog pee, which has helped it grow big and strong, but you probably don’t want to consume this. Let the garlic there be a fun nose bouquet for the doggies. Instead, go deeper, you’ll find it in partial shade areas that have good drainage. If you cut them instead of pulling up the bulbs, the stems will grow back.
Foraging for food is one of the fun ways of developing your skills of collecting. By getting goodies in the outdoors you’ll be more comfortable getting your hands in the soil, seeing the tiny worms and beetles squirming about harmlessly. Just being together with the cool earth on the forest floor is healing. When you take food from the earth, remember to provide an offering. I always carry a bottle of water with me when I go foraging. In my experience, if you don’t give a satisfactory gift when you take food from the earth, a thorn will snag your sweater on your way out.
If you don’t wish to offer water, you can also offer your labor of love. If you see a snail trying to get to a safe wet area, help it to its destination. If you see an edible mushroom that needs to be poofed so that its spores reach new homes, do so. If you see a patch of urban land that has been ravaged by construction and leached of its nutrients, try throwing down native, non-invasive wildflower seeds. If you see trash on your trip, collect it and dispose of it properly. There’s plenty of fun ways to feel connected and grateful for the bounty we get from the earth, and this kind of thinking allows me to feel present and grounded.
Fun things I’ve found foraging in an urban/suburban landscape:
-wild garlic/allium
-morels
-raspberries
-puffball mushroom
-dandelion greens
-japanese knotweed
-quickweed (guascas)
-chanterelles
-black trumpets
-wood ear mushrooms
-young bamboo sprouts
-walnuts
-mulberries
((This is part two of my Guide for Frugal Witches series))

Grimoires for Frugal Witches, an introduction
This article is NOT generated or aided in any way by artificial intelligence or language models.
One of the most business savvy and sensible thing for a witch to do in this economy is to start writing a grimoire. Doesn’t have to be fancy, can be any type of notebook. Tracking your thoughts, ideas, and jotting down every fleeting thought is important for saving your hard earned coin. You’ll know where you’ve been, when to go. It’s the most basic way to compile a compendium of your own creative and rich ideas, providing knowledge for generations to pass down within your community.
Types of grimoires:
-lined notebooks
-dot, grid, or blank notebooks
-handbound assorted or blank pages (more on this here)
-recipe cards
-a box of loose papers, cards,
-a blog
-a gardening log
-a sketchbook
-a Trello board with organized lists, spells, recipes, and potions

A grimoire is a book for your spells, beliefs, tinctures, and anything related to the spiritual tradition. Instead of comparing a grimoire to a Witch’s bible, it more closely resembles the note taking app on your phone. There is no need to stifle yourself with the fear that you will be messing it up, if you scratch out a page, write over errors, etc. I have never successfully written down the entirety of my knowledge and learnings in one place because sometimes you don’t carry the same notebook out into the field. I came across wild raspberries while on a hike one time and instead of writing down the experience and where I had gone on this hike, I snapped a picture that was accidentally deleted, metadata and all! The information is gone now, and I still don’t quite remember where I saw those raspberries, or if they were real raspberries or some poisonous look-alike. The process of writing or documenting what you come across is simply a process to help refine the information so it stays in your head. What I’m getting at is that if you write it down, you’re using a finer sieve, and the big good chunks are less likely to fall through.
The most valuable information and intuition is already at your fingertips. It might be helpful if you are completely new to the spell casting process to follow a direct recipe or set of instructions, to get a feel for it, but I would caution against the use of exclusively other people’s spells. I believe it throws off your own intuition and natural sense, the one that naturally sprung from your soul when you saw a floating firefly for the first time or sniffed the pulp of a poisonous berry from your ruby-stained fingers. This intuition will pull you in the right direction of growth, including ritual, ceremony, and the “proper” way to connect spiritually.
Intuition is what pulled me towards accepting that I was never going to have a complete grimoire in one place. This allowed me to indulge in the diverse platforms and really flesh out the ideas that live in completely separate notebooks. I didn’t worry about how I was going to transfer the data from one place to another, or how I was going to compile it all. The information is distilled internally for later use and oral history. Finding a community and gathering the wisdom of other witches will help develop your own style of engagement, whether through a forum, youtube comments, or discord servers. As you come across the same things, or meet people who have distilled their own information– if you do this enough with an open mind and a hunger to know more, your internal grimoire will grow big and strong.
Hand-Bound Booklets, Grimoires, and Journals.
One of the most useful skills I’ve learned is how to bind books by hand. The ingredients you need are simple.
-a sewing needle
-string (sewing thread, embroidery floss, dental floss, sinew,
-substrate on which to write (this can be paper, but it can also be advertisement inserts, sketching paper, vellum, any kind of junk journal material, cardboard cereal boxes, plastic packaging).
I’ve only ever needed to know one hand binding technique. There are many of them. You can find them on Youtube very easily, and being resourceful is one of the skills a good witch must have! I’ll point you in the direction of what keywords to search though. stitch, text block, bookbinding, coptic stitch.
Honing this skill, of binding your own books, frees you from the spontaneous journal purchasing. You can purchase pretty paper, customize according to your desires, and bind pages together in a way that suits your needs. If you want half grid paper, half junk journal, you can do that. If you want to sew in pockets and little areas to store trinkets between the pages, have at it. If you want a big flap of paper folded up that can be unfolded, you can do that. And best of all, your protective book spine or cover is up to you. You can have leather, if you have a knack for that, or even a fabric cover. Soft, hard, plush, maybe you want it to be between two CDs or between two slices of bread. The purpose, longevity and life of the notebook is in your hands. This is one of the most empowering skills a witch can develop, and it should only take an afternoon or two.
((This is part one for my Guide for Frugal Witches))
DIY Chicken Coop!
This article is NOT generated or aided in any way by artificial intelligence or language models.
So I finished the chicken coop a while back, but because of a variety of non-essential stressors with my condo neighbor, it’s been very difficult to manage the issues and get things organized.
The re-organize the narrative, all the chicken coop project stuff will be compiled under “DIY Chicken Coop Project”. The draft ideas and design were discussed in my original hens post here but the final ideas that were implemented will be on this page!
Changes in the plan!
A) Instead of purchasing, I opted for a handmade chicken coop.
B) Instead of making the A-Frame from Ana White’s design, I made my own design.
C) Instead of a tractor A-frame that is portable, I made a stationery A-frame (as the weight of the A-Frame design is too heavy, >100 pounds)
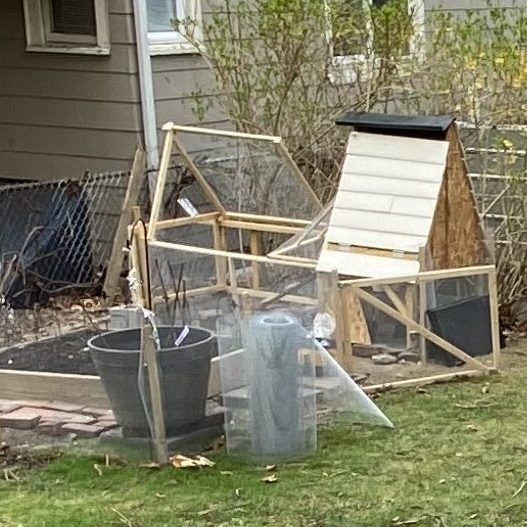
I ended up with a 3×2 feet triangular prism shape. Here is the final build!
Narrative Step by Step
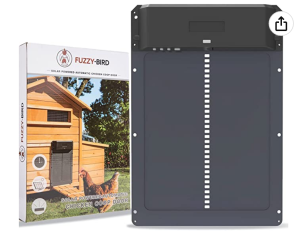
The first thing I had to do was use a jigsaw to saw a solid pine door in half. Optional, of course. It was painted already. I did not seal the ends even though I should have. With difficulty I screwed and/or nailed on the OSB boards that were cut to fit the size of the automatic door I was planning on purchasing. I used scrap OSB to act as a temporary door with the wooden hinge while I was picking an automatic door. I ended up landing on this one Fuzzy Bird Automatic Coop Door (fyi, this is an affiliate link and thank you if you do use it,) and it works great. No complaints thus far, I’ve had it for about a month. It works as specified and you just have to make sure you have some sun, although it’s been cloudy here in Boston and it still works.
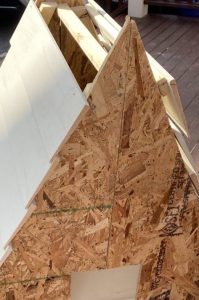
After completing the base of the coop, (and neglecting to paint the insides again because I’m edgy and youthfully naive), I proceeded to make a square-ish frame for the door that would open and close for access into the coop. I took pointers from the Catawba build to attach the hinge to a fixed piece near the bottom of the coop, which I did. I cut wooden siding that I bought secondhand and had just enough to make the roof on both sides. I should have sealed the ends, but alas, laziness is a never-ending battle that I frequently lose.

I repeated the framework for the other side, and added a third point of contact at the apex of the coop for stability for my wobbly triangle prism. It was much more sturdy once I did that, which makes sense.

After making the bones to the coop, I tested the hinge multiple times with glee. I was excited that I had made something that didn’t fall apart immediately. The roof was a piece of black sheet metal I got for free that had two flaps already. bent it down the middle and used it as a flashing/roof situation to allow the hinged side to move. This of course made the top flashing piece sit on the roof asymmetrically but I will revisit if it continues to be aesthetically displeasing.
The base of the coop was sat on top of wooden 3×2 wood frame, approximately 3ft wide, 2ft long, to match the base size of the coop. I did not install a droppings tray, and I was more focused on just getting it done because my chicks needed to be in the coop ASAP. The metal siding was temporary here, as seen below, and I fixed and made a permanent run when I finished the process. To increase the height and level the whole coop, I used various rocks/concrete leftovers in the backyard. I did not do this with the run so it ended up being wonky. Oh well.

Instead of the coop door for the hens facing out, I pivoted the coop (and the base of the coop) 90 degrees to face the run. This made it accessible for the chickens to come and go as they please. I made a sturdier run with wood furring strips and 2x2s, and the top could be opened with a hinge. The run is approximately 7ftx3ft. The area going down into the run (right above the hen entrance) was an interesting build. I ended up making an irregular triangle prism at a 90 degree angle with only three supporting wood sides, covered in hardware cloth. I don’t have a picture of that right now but I will get one. That piece can be removed entirely for easier access to the lower part underneath the coop.
Overall the build was satisfying and really fun, and I only pulled my hair out a couple times. It took me about 2-3 weeks to make everything, and another two weeks to finish up and correct any major design flaws.
Hurray! The chooks are very happy in their house. All is well in their world, and that’s what counts.

Cost of Coop
A breakdown of cost (Approximate, with the inflation of 2023 I’m sure this will all be irrelevant soon)
Chicken Wire: Approx. 60ft long, 3 ft wide, 1/4th inch grid used. $~80
OSB board: (2) 2ft by 4ft board $11
Wood: (3) 2x3s (8 ft long) $~9
(3) 2x2s (8 ft long) $~9
(8) 2x1s (8 ft long) $~15
Screws: $~20
Various hinges and hasps: $20
Wooden door for base: Acquired for free from craigslist.
Metal roof flashing: Acquired for free from craigslist.
Wooden siding for sides of coop: $20 from craigslist
I’m pretty sure I still had wood left over, so you won’t use all of it.
It cost me approximately $184, maybe more likely around $200 for the coop. I’m sure if you were even more thrifty than me you might be able to get away with a completely free coop, if you salvage some wooden pallets.
How to (Not) Raise Chickens with Your HOA
This article is NOT generated or aided in any way by artificial intelligence or language models.
So, I was overzealous and too confident that I would be able to resolve the condo association issue.
Although I wouldn’t call myself a “community organizer” I think I am reasonable and have a very diligent work ethic. If I say I’m going to complete a project that I’m passionate about, I’m going to complete the project. My neighbor is very difficult to get along with. She has strong ideals that are completely separate from mine. I could probably write a whole case study about her narcissism and untreated anxiety disorder, but I won’t do that here. It’s easy to pathologize people when they don’t act in the way you wish them to. And honestly I don’t feel compelled to connect her with treatment either so no need to diagnose her in the first place.
What stopped the discussion of chickens in our situation was the issue of noise. She wanted me to “trial” having chickens, but I was never going to raise chickens just to get rid of them 2 months later. She was concerned the noise would wake her in the early morning. Despite multiple sources saying that hens are NOT noisy, a single link to a video of hens being rowdy during their morning egg song made her turn the other way. I was immediately crestfallen with this- what am I supposed to do? “I promise they won’t be that loud”?
She kept going on and on about not getting any benefit from the situation, and how it was going to negatively impact the value of the backyard. There were a million concerns. Drainage, size of coop, waste, compost location, rodents, pests, smell, most of which were concerns regulated by the city.
Sending detailed rodent control plans, maintenance plans, citations, links to sources, and other research did nothing for me. Meanwhile, I was trying to draft the “right” email to convince her using every resource I could think of, including ChatGPT. ChatGPT conflict resolution is biased towards temporarily resolving conflicts or by presenting a surface level of professional empathy. You know, the kind where you roll your eyes when your boss says “We are all on the same team” or “How do you think we can get aligned?” The A.I. suggests things like “How do we move forward together?” or “Let’s find a Mutually Beneficial solution,” which reek of corporate doublespeak. I just want someone who has experience dealing with narcissistic lonely individuals to give me advice here. How do I make her see that she’s being a jerk? Playing along with her game and providing each and every tenet and contingency she asks for is a losing game for me. She would sooner call the department of public health on me than to work with me collaboratively.
No one wants to read someone complaining about their awful HOA experience, so instead I’ve compiled a list of tips and tricks to help you resolve your next HOA issue.
Tips for Raising Chickens in a Difficult HOA:
* Put a chicken-safe harness on your chicken and walk it, call it ‘good boy’.
* Build a 10 foot concrete wall on your side of the garden, equipped with anti-neighbor pepper spray that is pumped out when grumpy old ladies are detected
* If your neighbor refuses, simply insist that you need to build a 10 foot in-ground pool instead.
* If your neighbor refuses, begin trying to brainwash your neighbors to desire chickens, and tell them which chicken breeds are “quietest”
* Roast a whole chicken casserole and give it to your nice neighbors, meanwhile crying on their shoulder about how awful the predicament is.
*Dress up your tiny dog and teach it to cluck and lay eggs, to confuse the nasty neighbor.
*Register your chickens as emotional support animals
I hope these tips help you in accomplishing all of your chicken goals! *not legal advice, just a joke btw.
Raising Chickens (Scratched)
This article is NOT generated or aided in any way by artificial intelligence or language models.
It’s my first time raising chickens this spring. All the red tape has been cut, stepped on, and trampled. Do you ever have a stick up the ass neighbor that is dutifully a pain in the arse? I hate condo associations. It was hair-pulling frustration to get any sort of permission to start raising chickens– on top of that, I also have a neighbor who I informed about my planned chicken keeping in the spring and she already has issues that she wants to talk to me about. I have a feeling I can persuade her into being amenable to the chickens but what a pain. The city I live in has an urban agriculture ordinance for god’s sake. But no one is easily convinced to change, since the unknown is scary and changing the status quo can alter the community landscape. When, or if, I get permission, I’ll finally be able to break ground.
I’m planning on having a 3-5 hen coop and run with a maximum of 3 chickens at a time. The coop will sit on the farther end of the property line. In the spring when the foliage starts to come back, I’ll start cleaning and maintaining some of the grass/trees/plants etc on the unused lot past the house. Then I’ll plant whatever I like and have a good space for chicken roaming. Since she doesn’t want chickens on the property, that’s fine. I’ll have the chickens explore the space in the back. I’m totally happy setting up even a temporary chicken run that’s quite large in the back there.. hopefully she doesn’t complain for no reason. Annoying dealing with a negative nancy who literally can’t come to any agreement that doesn’t skew in her favor. I have no issues publicly voicing my complaints against her as she has no issues voicing even the tiniest complaints against me for the smallest of inconveniences. It’s not my first rodeo dealing with people who say I can’t do things. For some reason these nay-sayers have nothing else to worry about? And it’s really frustrating.
I’m hoping for at least one Easter Egger, and one Black Copper Maran. I’m obsessed with the idea of getting more than one color of egg… and I’d love to have a Lavender or Blue Orpington!! The soft grey of the blue chickens are too cute. The small fluffy blue grey chicks remind me of the fur on Russian Blue cats…
This would also work out that I’d have 1 possible green/blue egg layer, 1 dark brown egg layer, and 1 medium brown egg layer! The color of the eggs and the chickens both matter to me and this would perfectly match my needs. Also accounting for friendliness of the chicken, breed characteristics like broodiness, size, and compatibility with others.
easter egger == green/blue egg layer (possibly. I’ve read sources that have said that they are actually not always reliably green/blue because they aren’t always ameracauna hybrids and can have brown eggs).
Black Copper Maran == Dark brown eggs shells. It would be awesome if mine had speckles but this isn’t my one and only chance to grow chickens.. I just want to make sure I get the most out of it.
Lavender Orpington == Medium brown egg layer. I wonder if the lavender orpington is really that much rarer than buff orpingtons.
It would be awesome if I could get all 3 chicks at once so they could grow up together and there aren’t size discrepancies as they grow. I know that can be an issue like fighting amongst the birds and bullying.
The book I’m using for reference is A Chicken in Every Yard which was displayed in my library. It’s an eggcellent book and I highly recommend it for no nonsense chicken advice and guides helpful for the new backyard chook fanatic. Lots of yummy data and demystifies the food situation (what to feed, and when) for chicks vs grown pullets. Don’t feed too much calcium to chicks, but do feed calcium to hens.
My head was swirling with the possibility of getting a chicken coop set up sooner rather than later. My first choice, although I’m still considering this, but have mostly decided against, is this one:

…The coop has a soft wood fir body (it is colored cedar but apparently is fir). Apparently cedar is bad for chickens? Also STRAW is bad for chickens and HAY is okay, but HAY has seed pods so don’t use it for compost/mulching but STRAW is okay for mulching…. So maybe for a homestead you need both HAY and STRAW?? A lotta grass. Anyway, the fir body is soft and needs many preparatory steps prior to use.
Winterizing and weatherproofing this bad boy requires the following steps:
1)Waterproof all lumber, then prime and paint with exterior quality paint.
2) Install hardware cloth to underside of nesting box.
3) L brackets on corners, then pavers to ensure it doesn’t fly up or get knocked over.
4) 1/2″ hardware cloth skirt that extends on outside of the coop (digging rat, snake, or other predator deterrent)
5) Hardware cloth seam for vents and roofing.
6) Extra waterproofing for roof (possible attaching galvanized steel roofing and water runoff gutters.
7) Hasps, spring loaded eye hook fasteners, carabiners, other hardware. Needs at least 1 latch (would get 2) for the nesting box.
8) Raising roosting bars
9) Install extra chicken run for more space. (This is the most costly addition I believe but this is a step I’ll probably take later in the summer when my hens are bigger).
I slept on this idea to see if I would feel any differently the following day, and I did. I decided that I would try to make my OWN chicken coop based off of the very popular A Frame by Ana-White. She has a plan that might make costs under $100 not including hardware cloth, and to do this I’ll probably have to buy a jigsaw. (Yay more tool acquiral!) The chicken coop that I’ll be make will be inspired by the following designs:


Aside from a few wood projects I’ve never really built anything this big before. I’ll try to keep the dimensions similar to the original A Frame design so that I don’t get confused and do too much maths, but I’ll alter other parts accordingly. I love the look of the one on the right, with the very picturesque sloped roof and small profile. It would be much too small for 3 hens, I think? Some people might disagree and think it’s plenty. Anyway, the sled A frame on the bottom left looks awesome– except I can tell it has more plywood, eaves, and high wood cost.
The A frame on the top left is most basic and cost effective, and will be the base template for my design.
My first and now scrapped design draft from this morning:

My second design draft features some changes and revisions and I much prefer the second draft. For some reason I put the handle on the top of the triangle in the first draft to accommodate a person sized door. I’m not sure if I want to make a person sized door anymore. It would greatly change how the side brace would work for the front of the tractor, as in, should I bother having a handle if it doesn’t pick up the entire weight of the structure? That was my original reason for a handle coming from the top of the coop. I don’t know why the lack of symmetry bothers me so much but it does!
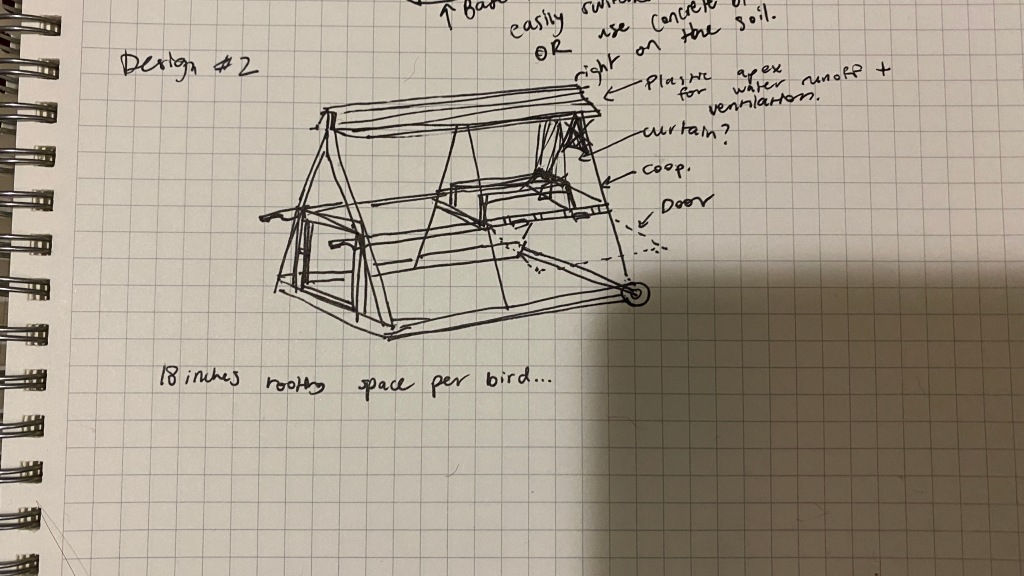
Not sure how I’m going to get the roosts set up in this bad boy if the doors open up from the sides… can’t attach to the doors so I’ll have to do it horizontally the way I’ve drawn it in the picture, but then it feels like it’ll be too cramped! Unsure. That’ll be a design issue I’ll have to resolve later, probably. Something over the middle truss might be good, just not sure if 3 hens can fit on it. Might need to put another and hope it suffices. Or put a long one going from the front to the back of the whole tractor (like a closet rod or something).
I’ll probably get started on this project when it’s warm out. Since recently the temperature has been super variable and strange for winter, I don’t know when spring weather will permanently come to stay.
I’m excited by the idea of trying to grow some cover crops and wheat (even though I have less than 100 sq ft to plant and many vegetables and other things planned for growing already this summer) but I still want to try. I’ll spread cover crops throughout the backyard (and way past) in order to give the chickens something to eat.
Things I like about this

Maker’s Market
This article is NOT generated or aided in any way by artificial intelligence or language models.
I’m super excited to be vending at the next Maker’s Market run by the Somerville Growing Center! Whenever I get involved in something entrepreneurial I get too serious about it. I easily get distracted from the intrinsic joy of making miniature food and get overwhelmed by the marketing choices and things like margins.
Because making minis is not the way I make a living, I feel less pressure to make my crafts or items marketable or sellable because of that. This is a blessing but also makes it difficult to be realistic with what people might enjoy (in a commercial sense). A lot of my small items I make are very fragile, and not easy to transport. I made these tiny chanterelle earrings a year ago, which are dainty and adorable to wear. However, a single trip to the shower (or getting caught in a huge downpour) could ruin the coloring and structure due to the composition of the clay! I used porcelain clay for the earrings, which is not waterproof, and easy to break down after water exposure. It keeps me awake at night thinking about someone who might have spent money on something I’ve made, only to wear it and be disappointed when it disintegrates after accidentally showering with it (For this reason I’ve not ever sold any of that first generation of chanterelle earrings.) Thinking back on this now, I’d like to seal them properly now, and see how they do after running the earrings under the faucet or something.
All of this to say, my craft table is chaos in preparing for tabling at the Maker’s Market on October 22nd on Vinal Ave in Somerville, MA. It’s the first annual Somerville Community Growing Center market, and will be right next to my favorite Union Square dog park. I’m honestly really anxious about it. I’ve never sold my work at a Maker’s Market before and I’m finally taking the plunge– honestly part of what spurred my decision to participate this time was because I picked up a foldable table off the street for free! At one time in my life I begrudgingly had to discard my folding table and it looks like it finally found its way back to me. Now I get to take part in a Maker’s Market even though I’ve been coveting a spot for the past three years. Hopefully this is a low pressure market so I can just show my work and enjoy a nice October weekend sitting in a beautiful part of Somerville with a nice hot thermos of tea. I’m less worried about making sales, and more worried that people will not find my work interesting to look at.
I’ve gathered a few finished pieces though and wanted to share them on my blog. I spent the past couple weeks feverishly making new pieces, adding metal findings, making pieces wearable– some of which I’m quite pleased with!

Yesterday I spent a few hours agonizing over how to tie these tiny meringue plastic bags shut with embroidery floss. Also, there are just so many things to consider that it can take hours just to finish a few small pieces. After completing them, I then have to consider how I will arrange them, or if they will even eventually make it into a group photo. Together the little meringues and foxes look quite sweet together though, no?
On the topic of agonizing, I tried to solder again. Perhaps the temperature of the soldering iron was too low, because it wasn’t as sturdy as I would have liked. I just want to make tiny wire baskets but the process is much more frustrating than I predicted it to be! Even with a proper soldering iron, flux, and standard solder, there is still a lot of tinkering to be done to ensure there is a decent bond. I’m unsure if it will hold without brazing or if I can even reach temperatures high enough to do that with my soldering iron. My guess is not!
I spent another few hours trying to figure out the appropriate way to display the tiny 1:8 scale individual sweets. My favorite art store in the Boston area (Playtime) in Arlington always has my back and I sourced my favorite boxes from them. Can’t wait to splurge on more art supplies as an excuse to “prepare” for the Maker’s Market.

One of the first things I ever fantasized about making were macarons. Delicate feet on tiny pastries, and a delectable filling on the inside. Something in this box you might be unfamiliar with is the hamantash in the center. A jam filled cookie-like pastry from the Jewish bakery that my partner introduced me to. He grew up eating these and I thought their shape was extremely cute.
I put a lot of work into all of these individual boxes. I’m thinking of bringing this to the Maker’s Market just to display, but am unsure if I want to put it for sale at this time.
Recently we’ve been going downtown for dimsum and after the meal we’d… go to a bakery and pick up more goodies. An indulgence that I am now using as an excuse to go and get the illusive plastic packaging for my miniature buns.

Encased in their forever homes, these breads are enclosed in plastic packaging recycled from a Chinese bakery in Boston I enjoy. Sugar twists and sweet potato bun. A few of these will be sold at the Maker’s Market for sure! I wish we had a Chinese bakery in Somerville… I would probably buy their bread every single day if it were next door.
If you want to come see some of my stuff in person, mintyspoon atelier will be at the maker’s market on Vinal ave on Oct 22nd, Somerville Community Growing Center.

Miniature Wooden Counter
This article is NOT generated or aided in any way by artificial intelligence or language models.

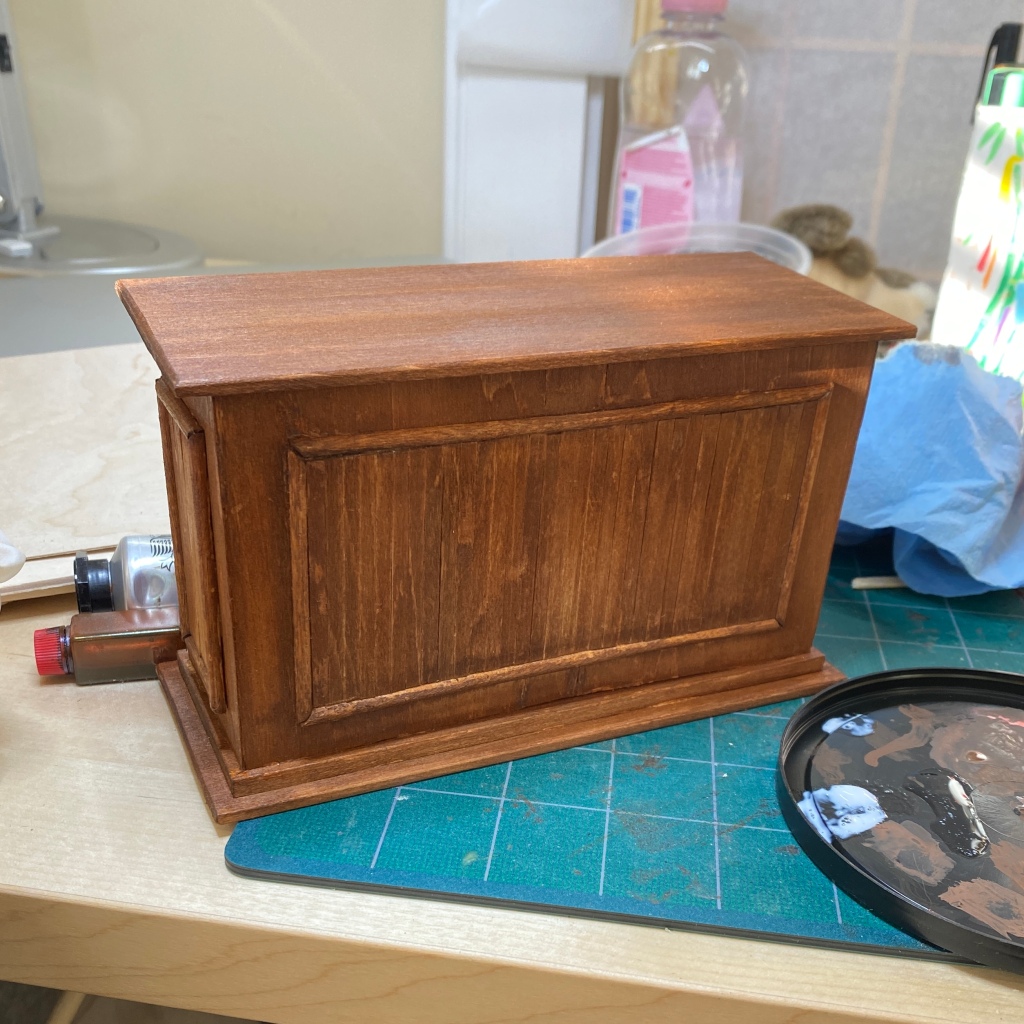
Small pastry case sitting on top of unvarnished wood box
(follow my insta story for instant updates) https://www.instagram.com/peachizashi/t
I wanted to make a wooden counter for my pastry case and other countertop display desserts to sit. So I designed something fairly simple, just a rectangular box sitting on top of two offset sized flat pieces.
I sanded the corners so the walls of the body met at a point, not sure what this technique is called.
I did a poor job with that so I had to use lots of wood glue. I knew from working on a different project that the wood glue would cause the varnish to not stain properly so I tried my best to reduce the surface wood glue…
Making miniature furniture is much easier conceptually when I think of the structure of the project first, (box, cylinder, etc.) before moving on to details like paneling, carved pieces, handles. It gets overwhelming trying to design furniture at times given that I’m so inexperienced working with wood.
I added paneling by cutting wooden dowels in half lengthwise and then cut into frames, then used coffee stirring rods as the individual planks for the panels. It came out quite cute!
Varnished with a small bottle of brown wood varnish that was leftover from a Billy miniature pottery shop kit. You can watch the process for that Billy kit here.

While doing the measurements (to ensure my pastry case did not seem too out of proportion), I came to the realization that I often work on a 1:8 scale. This was not a surprise to me given that 1:6 (which is dollhouse scale) felt always too big and not small enough for my taste and 1:12 scale seemed too small. At 1:12 scale it feels like you can’t really touch or manipulate objects with your hands.
After doing the varnishing I sealed with two very thin gloss coats of mod podge. Because of how porous the balsa/bass wood I used was, I didn’t want to try a polyurethane coat although that could have been an option. I prefer the more vintage used wood look so this suited me fine.
Thanks for reading! Stay tuned for more updates by following my blog.
devlog (Perhaps #1, perhaps never again)
This article is NOT generated or aided in any way by artificial intelligence or language models.
So after being inspired by an indie game developer and artist who is making their version of neko atsume, I have decided to attempt to learn how to code in godot… again. The first time was like, twelve hundred moons ago. I’m now much older and have far less patience, so as good of a time to try as any.
The following are just stray thoughts and notes I had while going through the introductory prologue and first 2D tutorial example in the godot documentation. The tutorial is actually quite clear. For some reason I was unable to find godot documentation my first go-around in learning which is a real shame because the current documentation is crystal clear. I probably would have been able to follow along back then. Today, I find myself not having too much trouble at all aside from a few technical details. <insert doodle of myself adjusting glasses, looking at text on screen >
Under the inspector tab, the physics_material_override must be edited if you would want a specific instance to be unique- and hit the button.
“Every GDScript file is explicitly a class”.
Delta is change in frames.
_process checks for some argument or existing principle every frame.

What the heck is a singleton? I wrote this note like yesterday and I still haven’t looked it up and I still don’t know what it is. Is it like a simpleton? Aka, me?
Var (whatever):
whatever is written after var is not important, it’s just the name, like sockBreaker, roundSquare.
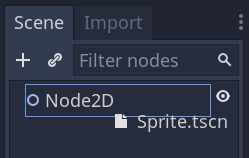
Dragging a .tscn file into Node2D scene to create an instance. I can’t remember what a .tscn file signifies, hope it’s not important.
Godot is interesting, they have lots of fancy UI for connecting code in a high level fashion. But you can also use code to do so:
“You can connect signals via code instead of using the editor. This is necessary when you create nodes or instantiate scenes inside of a script.”
The platform itself is really similar to Adobe Premiere. I love using Adobe Premiere so everything feels rather fluid, including going back and forth between the workspaces. I’m not sure what the filesystem is exactly- it seems like there is just random files that exist and they’re pulled up in the side for you to drag around and use. Feels like magic.
Thoughts on coding in 2022
Suffering. I feel like I’m not even barely scratching the surface and I’m already suffering. Wrapping my head around the concepts makes my head feel stuffed full of cotton. Why am I doing this? I have no idea. I think I’m being motivated by this pipe dream that one day I can code my own potion-making witch game where pixel art is animated in super cute fashion and there are oodles of combinations, fun achievements, and collecting to be done. I’ve wanted to do that for a few years now, I’d say at least 3 or so. My childhood dream of course was to make miniature food, which I’m still hoping to pursue.
By the way, I’ve put a pause on miniatures for now as I’m in the middle of moving. In August I’ll finally be in my permanent space and able to do miniatures in earnest again. You wouldn’t believe the absolute chaos that I call my unleashed chest of miniature-making paraphernalia and sundries. Not being able to make miniatures while I’m in this temporary holding pattern is painful and confusing for my identity. I feel my morale decreasing, I’m more grouchy, and I’ve picked up animal crossing new horizons again… cue lack of progress on any artistic endeavors and more playing on my switch WHILE it’s charging…
Back to the important topic on hand– So, a few years ago, I had this brain baby to make this game, and other similar types of games, and I struggled with coding in the past. I struggled through learning Ruby, “object-based” coding, whatever that means, and attempted HTML and Javascript through the almighty Khan Academy. I’ve learned that I truly Khan’t do HTML or Javascript to be honest it will sit in the corner with my ‘I’m not so good at those’ hobbies. It doesn’t bode well for Python-based GDScript.
“So, how’s it godot-ing?” – my partner wanting an update on my progress so far, 2022
Meanwhile, skip ahead to July 2022 and I’m finally now going through the Godot documentation and finding some parts more legible and readable and user-friendly than ever before, but I am absolutely DREADING the inevitable wall that hits new programmers. When your clearly-legible-documentation-tutorial training wheels get shucked off and you’re forced into grown-up-google-and-find-the-solution-on-stack-exchange pants. Oh boy oh boy. It’s usually at that point I get completely turned around by the multitudes of technicalities, unknown verbage and minutiae. I’ll probably be expecting to get an easy solution and it turns out the solution might be some undecipherable code a stranger is recommending for me to copy-paste into my slap-job to fix the issue and I’ll have zero idea what it means.
Myths busted:
• Reading hacker news does not make you a good coder
• Not reading hacker news does not make you a good coder
• Knowing shortcuts in the workspace does not make you a good coder
• coding sucks but the dopamine-hit when coding goes straight to my brain and it feels really good
We’ll see if I update again but doubt it
Indie perfume review (Death and Floral, Alkemia, Fantome)
This article is NOT generated or aided in any way by artificial intelligence or language models.
Another perfume review! All of my opinions are my own, not sponsored, all scents were purchased with my own money.
Art School Drop Out – Death and Floral
Notes I get: herbal medicine/pencil shavings/concrete
Whoa. Smells like I walked into a Chinese herbal medicine store and there’s barrels of dried cordyceps out. Not literally though. I think sometimes what you smell in there is actually some sort of ginseng but I’m actually not sure. When I whip out the wand from the tester tube and smell it right away you get whacked in the face with fresh paint. When it fades it becomes graphite, pencil shavings, has a very cool tone to it. there’s something fresh and herbal to it too, like I pulled out a bunch of weeds from the cracks in concrete. I think this must be the car exhaust. This is an art school I’ve personally never been to but I’m sure someone out there has an art classroom that smells exactly like this. This becomes a soft skin scent very quickly and has a very familiar musk that most indie oils have. Super interesting and I like it!! I will be wearing this next time I go do something edgy, like ride a skateboard or something. It feels like you’re wearing racy negligee under your clothes and no one knows except for you. I don’t think I’m going to full size it at this time. 2/5
Fortuna – Alkemia
This is my first time trying Alkemia scents. It’s similar to BPAL in that really WHACK you in the face with scent so you GET it the first time around. Fortuna is like that, in the punch in the face. It smells like a combination of potpourri and if I had walked right into the laundry section of Bed Bath and Beyond. I get dark reds as a color. really not a big fan of this scent and can’t see myself wearing it. I think it might have to go in the “someone else might want to try it?” This was a free gift w/ trade. But I might feel bad even offering this as a free gift tbh. 0/5
Baccante– Alkemia
Official notes: The essence of an untamed spirit. High bush blueberries, wild ivy, Spanish lavender, aged oakmoss, tonka, decaying bark, and forest fungi.
Notes I get: synthetic blueberries/wild ivy/mushrooms+rot
Synthetic blueberries but veiled thinly with something bright and green, something green and floral? It’s like a white floral. I think that’s the wild ivy, actually. Dries down to a sharp almost sweet lavender (but no sugar). It goes a bit soapy, I don’t get any tonka or vanilla to ground this scent. Once this dries down and the scent mixes with your skin, there is a very prominent funky thing that happens. It does get a bit funky and mushroomy. This is the blue box of grocery white button mushrooms kind of thing. Unfortunately there is a soapy white floral background on this scent so even though the mushroom scent (which is only really there if you put your nose to it) is super cool, I don’t think I want to get a fullsize and I wonder if I’ll ever use this scent. It might be good on laundry? 2/5
Mesnee D’Hellequin – Alkemia
Official notes: The breath of the wild northern forest on a full moon night. An uncivilized tangle of balsam pine, cypress needles, cedar bark, teakwood, vetiver root, galbanum, lichen, moss, dried leaves, damp earth, and forest fungi.
Notes I smell: pine/galbanum/funky cold mushrooms
I’m very excited about this one. I remember the notes being something earthy and mushroomy. I hope it does what I have in my mind. Yeah whoa, this punches that forest scent straight up first thing. It really reminds me of a pine box, or like a sauna room. This is a cool, cold scent, reminiscent of the night. It has a bit of a smell that reminds me cleaner? Or some kind of pine freshener? I don’t think it has enough warmth for me to be worn but it is a very effective atmospheric. Again, I don’t get any fungi in the whole drydown phase until I stick my nose to my wrist at the end, then I get a bit of that same funky mushroom as in Baccante. So far Alkemia is doing a good job with evoking imagery through their blends but I’m not in love with the scent profile for actual wear. 2/5
Autumn Fields – Alkemia
Official notes: A ramble through meadows and fields in early autumn – crisp green pumpkin flesh, fresh Kadota fig, amaranth, cut orchardgrass, and oat hay.
notes I get: pumpkin chai latte/hay
WOW pumpkin chai latte?? It smells like I’m drinking a watered down iced pumpkin latte from dunkin donuts wtf? I think this really shook me from the fact that it smells creamy. I get some fresh pumpkin, some sweet hay, but I don’t get any of the grassy earthy smell I was expecting. I’m unsure if that’s what was intended either. I think this smells really good though. It doesn’t punch with the spices too much, nor does it have a creamy overindulgent milk note or anything. Is that cardamom I smell? Wow. This smells really yummy and fun to sniff. If I were going apple picking this year I might wear this but it feels very specific in its use case. I think someone obsessed with pumpkin spice latte might really like this though. 3/5
Smoky Mountain Mallow – Solstice Scents
Official notes: Wood Smoke, Fossilized Amber Resin, Guaiacwood, Labdanum, Nutmeg EO, Marshmallow
Notes I get: campfire smoke/marshmallows
This is my first time smelling something from Solstice Scents!! This was a sniffie included in my purchase. It smells like marshmallows cooking over a smoky dry campfire. Wow. This is a very effective dry scent. It’s simple and evocative. I honestly might consider buying a full size of this instead of investing in a camping stove/camp gear hahah. 4/5 I love receiving sniffies because it’s like- here’s a tried, tested, and true scent that someone has very much loved.
Triton – Fantôme
Official notes: The realistic scent of a stormy ocean. Murky sea water, ambergris, ancient forest mosses, crushed ivy leaves, frankincense, resins, ozone, with a hint of citrus.
Notes I get: ivy/ambergris/salty sea water
This is ozonic, metallic, oceanic, aquatic. It evokes the mighty ocean and for people who don’t have their sea legs, you might feel a bit squeamish from the realistic ocean scent. Something about the turgid ocean ambergris combination made me feel ill.
You get the animalic ambergris pretty strongly. Perhaps I’m extremely sensitive to it? Or maybe in combination with the metallic note on my skin it becomes stronger? I’m not going to lie, I kind of retched when I smelled it on my skin too close. When you’re farther away you get more of the citrus, ivy leaves and salt water ocean air. I think the blue ocean aquatics in this are a bit too synthetic for my taste, it somewhat reminds me of a blue colored ocean candle from a BB&B. But it definitely evokes a very specific ocean, just not one from my own memory. It also comes in a pretty bottle, with a rollerball and gold cap? Too cute. Unfortunately giving it a 0/5 due to my sensitivity to this strong scent.
Hope you enjoyed reading my review!
